Levels is a tool in Photoshop which gives you the ability to modify the brightness level of an image's histogram. Since every photo's histogram is unique, there is no way to automatically adjust the levels for all your images you captured by the click of a button. A proper understanding of how to adjust the levels of an image histogram will help you to finish your image and better represent the tonal quality for your final image.
Today we are going to discuss some basic workflows you should plan to use with every image you want to try and finish in Photoshop. The first step in your workflow could begin by opening the raw or jpg image in Photoshop by simply selecting File-Open (CTRL O) and Browse to the location on your server or hard drive for the image you wish to work on. Once this image is viewable within Photoshop you can enlarge it to fill in the entire workspace by selecting View-Fit on Screen (CTRL 0) or CTRL + to zoom in or CTRL - to zoom out.
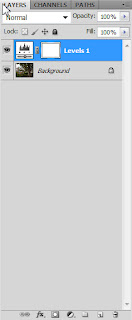
Then to create a new layer for the levels adjustment, go to the bottom of your layers panel on the right side of the Photoshop workspace, and select "Create New Fill or Adjustment Layer" and select "Levels". This will add a new layer for your levels adjustments without making changes on your original image. With the levels layer automatically highlighted after you selected it, the histogram will appear at the top of the layers panel. You can select from the drop down box, RGB for the composite, or each individual color channel, which you should do to determine if the highlights have been overexposed or blown out highlights by reviewing each individual channel.
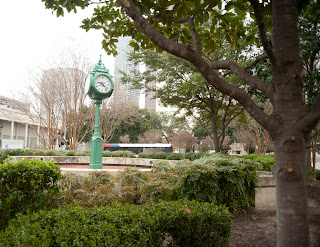 |
Original Overexposed Image
(Notice the Blown Out highlights in upper left hand corner) |
Please review a previous blog on how to analyze an image with histograms for more information about what specific information histograms are providing for us. If the histogram indicates the image is underexposed, you would see the black area not go completely over the to right side of the histogram. If the image was overexposed the black area would not only go all the way to the end of the right side of the histogram, but would show high values indicating serious over exposure of the highlights. In this image, you see a single line on the right hand side that indicates the image is overexposed. There is nothing you can do in Photoshop to fix this. If you had space on the right side where the image was underexposed you could drag the little White toggle switch directly under the right side of the histogram and drag it to the left until it meets the left edge of the black histogram data. Likewise if the left side of the histogram had black space on the left side you could drag the Black toggle switch directly under the left side of the histogram and drag it to the right until it meets the left edge of the histogram data. Once you have made those two adjustments, you can drag the center toggle to the left to lighten your image or to the right to darken to your taste as well as to add contrast to your image.
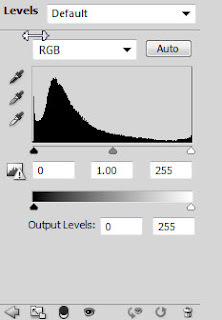
Thus, if when you were photographing your image you made compensation adjustments at the camera upon capture and dialed in negative compensation, your image here in Photoshop would show that the histogram data on the right side would not be all the way up next to the far right side of the graph. Then when you make the adjustments discussed above you could lighten up your image if it was too dark because of the compensation adjustment on the camera at the time of capture.
So with this image it was taken with no compensation, so it is overexposed, and the only thing I can do is darken or lighten the image and try to add some contrast to make it more interesting. Then I can click on the little "Eye" on the Levels layer to see my before and after changes. I can also click on "Levels 1" name and rename the layer or click on the Fill or Opacity toggles to allow me to control how much effect I want this layer and my adjustments to impact the final image.
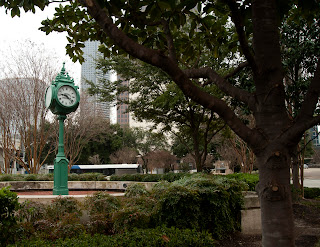 |
Final Image
(Improved contrast but can't fix blown out highlights) |
Then at this point, I normally save the image as a Photoshop image by going to File-Save As (PSD file) (SHFT-CNTRL S) so I can always go back and completely change the settings in the future if I wish as well as save the image as a jpg for posting on the web or emailing for others to easily see and view. When you save the images, try and rename them so you don't write over the original file. With all the changes in Photoshop, by not doing anything to impact your original image, you can always in the future go back to this image and completely redo the image in Photoshop with new tools that might be added in the future. If you save these changes over your original file, your original image is lost forever.
Try to make every effort to get that exposure right at the time of capture! Don't blow out the Highlights and forget to not make the compensation at the time of capture, in the hopes you can fix it in Photoshop later.
Have fun...Learn lots from every outing...Amaze yourself at how easy this is and the big difference it will make in your images when you apply these simple concepts every time you head to the field.
Have fun chasing the light to capture that Killer Image at the Perfect Tyme!


 Then to create a new layer for the levels adjustment, go to the bottom of your layers panel on the right side of the Photoshop workspace, and select "Create New Fill or Adjustment Layer" and select "Levels". This will add a new layer for your levels adjustments without making changes on your original image. With the levels layer automatically highlighted after you selected it, the histogram will appear at the top of the layers panel. You can select from the drop down box, RGB for the composite, or each individual color channel, which you should do to determine if the highlights have been overexposed or blown out highlights by reviewing each individual channel.


I might be way off base, but could then HDR both the images together to get a slightly better hybrid of both?
ReplyDeleteEric: You are right! Anytime you have this situation and the dynamic range is too large and the lighting condition is bad, you can take multiple images and merge them in Photoshop using the HDR module. Unfortunately I couldn't do it with these images, because I took them intentionally overexposed to use in this example on this blog for one. Secondly, to use HDR you need to put the camera on a tripod and I would have needed to make sure at least one of the images isn't overexposed, but they all have to be the exact same image without changing the exposure or focus settings, and why you have to use a tripod.
ReplyDeleteGreat thinking!