Marti and I were in Denali, Alaska one early fall several years ago, and we were riding on a train to get to the Denali park, and I saw a lady on the train with a very expensive Canon digital SLR camera with a huge telephoto lens and she was doing drive by photography with her camera clicking away as she held her finger down on the release button capturing hundreds of images of a single buffalo. I just wondered when I saw that thinking, who has the time to look at 100s of images to find one good one, when you could just take some time to capture one or two killer images. The sad part, is what if all you did is capture a 100 overexposed, blown out highlight images of the same thing. All of your images would just need to be trashed!!
To get perfect digital exposure you need to be accurate especially if using JPEG settings as apposed to RAW capture. SLR camera type metering is only technically accurate with an 18% gray card, because reflected readings require an 18% gray card. Incident meter readings rather than reflected, are best for portraiture since they read the light falling upon the subject and NOT reflected from the subject. For landscape photography we can get away using the metering within our camera, but it is helpful to consult our color histograms before we walk away thinking we have captured the perfectly exposed image because our camera metering said so.
 |
| No Highlight Clipping |
Black Histograms
Let me start out by saying the most professional way to analyze an image is by viewing the image itself and not by totally relying on a histogram. A black only histogram is an option on most digital cameras to be a means or guide to evaluate exposure, but more importantly to identify over-exposure. It provides a measure of the amount of pixels all across the spectrum of black to white. Black is on the left and white is on the right of your B/W histogram graphic. The height of the graph represents the amount of pixels at each level of brightness. Darker images will move the graph more to the left, while brighter images will move it more to the right.
Clipped Highlights
 |
| Highlight Clipping |
As mentioned the primary value of a black only histogram is to determine if any highlights have been clipped or washed out. Overexposure of an image may create an image with blown out highlights for which there is nothing you can do to improve or fix the image in Photoshop. When this happens the image has been irreversibly damaged. Thus, histograms provide a means to identify clipped or washed out highlights so that you can change the exposure or compensation settings and re-shoot the image to protect and enhance tonal qualities of your image.
When this occurs reduce exposure, by dialing in negative exposure compensation, anytime you see clipping and blown out highlights. If the image is too dark after making an exposure compensation adjustment then the dynamic range is too large to capture the image adequately. Thus, you will need to try and use
graduated filters as discussed in a previous post or take multiple images and/or attempt to create an
HDR image with the use of Photoshop also discussed in a previous post, anytime you have too large of a dynamic range to accurately represent the full tonal quality of the image.
If images are underexposed and too dark, compensation can be made in Photoshop to properly finish your image and lighten it up, by dragging the right slider bar in Photoshop's Level command to the left until it meets the edge of the histogram.
Color Histograms
Color histograms are actually three separate histograms, one for the red, green and blue channels which will help you more accurately determine the correct exposure. Just as looking at a single black histogram, with the color histograms, you want to look at each color histogram individually to make sure each histogram doesn't indicate an overexposed image before you can determine if the exposure is correct. Even when using cameras with a
Highlight Warming System (HWS that blinks on your camera monitor showing the area(s) that are overexposed), those systems are typically looking at only one channel, so you could potentially be overexposed when the HWS doesn't indicate so.
White Balance
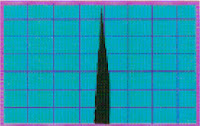 |
| Correct Exposure |
You can also read the white balance from a histogram. To do this, you need to take an image of an 18% gray card (fill the view finder completely with the grey card) under the same lighting conditions as the image you intend to photograph. You are neutral balanced if the spike appears in the same place in each individual color channel or the center of a black only historgram. Without using an 18% gray card, you can still evaluate the three individual color histograms, in that if all three stop at the same point on the histogram, then the image is balanced or neutral for the highlights. If you are shooting portraits, then you would want the spike to be dead center of the graphic to be perfectly exposed as if photographing an 18% gray image.
As discussed herein, getting the exposure right is NOT as simple as putting your camera on automatic and pushing the button to capture the image. When you have taken the time to go out and setup to capture the perfect image at the perfect tyme, you owe it to yourself to use ALL of your camera's features and capability to bring home a high quality image every time you snap the release. You will be impressed at your own work and others will be amazed at your work, if you make this kind of effort.
These steps only take a second or two, to make sure you got the image right, but avoiding them all together will more than likely still result in a "family vacation" looking photo, not matter how much effort you make in Photoshop.
See you out there one of these days when we are chasing the light for the Perfect Tyme.


No comments:
Post a Comment
Note: Only a member of this blog may post a comment.